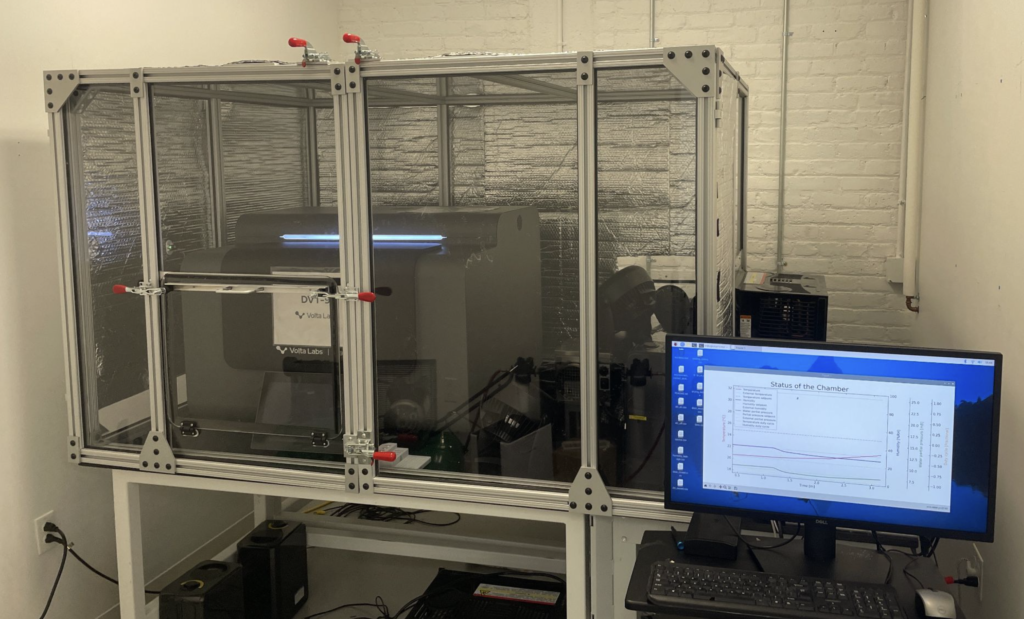
My current company’s lab automation instrument is specced to function in a wide range of possible lab conditions, from 19° to 25°C and from 20% to 80% relative humidity (rH). In order to validate the performance of the instrument in all possible environmental conditions, an enclosure needed to be built which had the capability to achieve and hold a temperature and humidity set by a user. I was the lead engineer on the project and was able to design, build, and test the enclosure on an accelerated timeline of less than 4 weeks.
My responsibilities included:
- Determining the size, form factor, and material of the enclosure to best achieve the desired performance with limited space and time
- Designing the enclosure in CAD, developing the BOM, and ordering parts
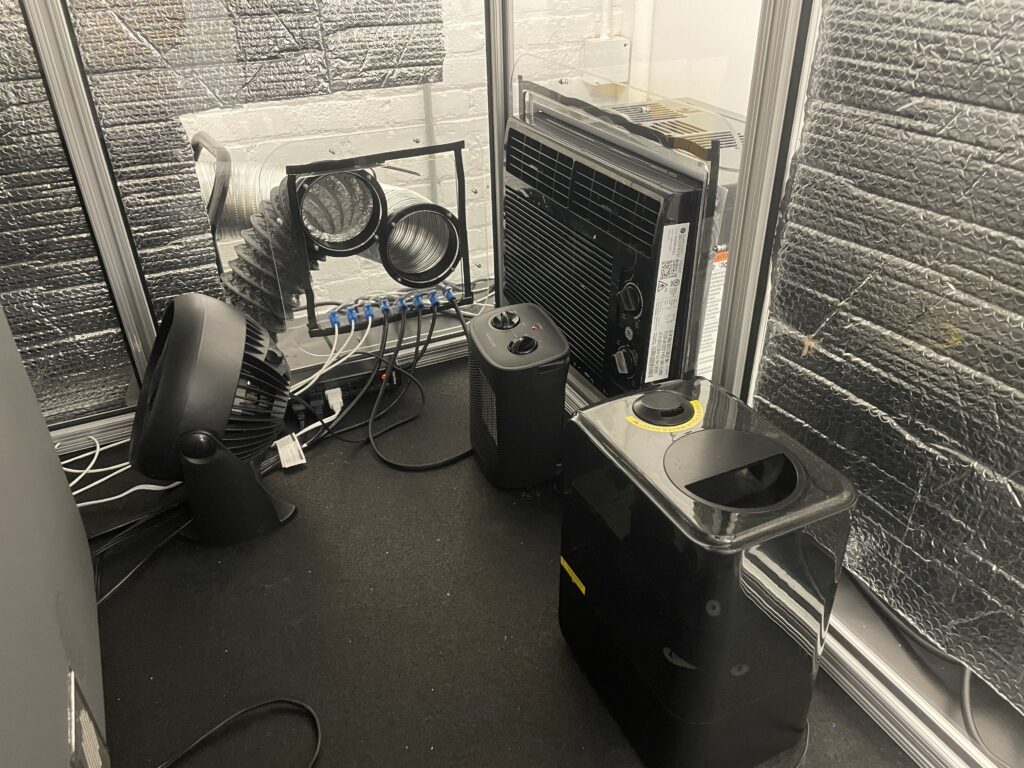
- Speccing and ordering appliances (dehumidifier, air conditioner, etc)
- Integrating appliances with custom built control electronics and software
- Project management to ensure that timelines were met and the budget was managed

Design Considerations
The design of the enclosure was challenging for a few reasons:
Balancing limited space with good air mixing
- To accomplish relatively uniform conditions on all sides of the instrument, enough space around the instrument is needed for sufficient air mixing and continuous airflow. Additionally, the instrument exhausts hot air during operation so enough thermal mass is needed in the enclosure such that the exhaust doesn’t have a drastic effect on condition stability.
- Since I didn’t have access to a CFD software, I had to rely on visualizing space layout in CAD and erring on the side of too much space rather than too little. I decided on a 4′ x 6′ x 3.5′ footprint.
Balancing airtight seal with accessibility
- In order to accomplish a high delta between interior and exterior humidity, the enclosure must be extremely well sealed. Every seam was sealed by compressed gasket, including all 3 doors and every edge of each acrylic panel.
- The front of instrument will be accessed on a regular basis to initialize runs, and the entire enclosure will be accessed infrequently to perform maintenance on both the instrument and the appliances inside the enclosure. I designed a small door at the front so biologists could access the instrument, as well as having the whole front panel on hinges so the entire enclosure could be accessed when necessary. All 3 doors are secured with toggle clamps to compress the gasket seal.
Balancing robust design with limited timeline
- To make the enclosure relatively cheap and quick to build while also being structurally sound, I decided on using an aluminum extrusion frame and acrylic walls. The extrusion was easy to assemble and the acrylic panels allowed us to be flexible with our design since all panels were small enough to fit in our in-house lasercutter. Acrylic is also a good thermal insulator and helped support the structure of the enclosure.


CAD
Before ordering parts, I modeled the enclosure in cad and used the model to refine the design and make a BOM. With support from a senior mechanical design engineer I was able to accurately model all off the shelf and custom components so I could generate dxf and stl files to lasercut, waterjet, and 3D print with.


Control Code and Electronics
To control the appliances and maintain chamber conditions, a raspberry pi was used to take user input for setpoint values and plot the current chamber conditions. The Pi communicates with and Arduino which calculates duty cycle percentages using a PID control loop, sets pins to open and close relays, and reads values from temperature and humidity sensors to close the loop. Solid state relays are used to turn on and off AC power to the appliances at the calculated duty cycle.
The appliances I used were a 200pt desiccant dehumidifier, a micro split heat pump AC, a space heater, and an ultrasonic humidifier.
While I did not write most of the control code or design the electronics, I was responsible for integrating it with the utilities, tuning the PID coefficients, and adding features to allow for PWM control of a new air conditioner unit which we will soon be implementing.


Assembly and Integration
Assembly was relatively painless with the help of a few extra sets of hands. Once assembly was finished I tried many different fan configurations, using smoke pens to visualize airflow until I was confident that air was being fully circulated around the instrument. I then placed temperature and humidity sensors in different locations in the chamber to measure any spacial gradients and ensure they were within our predefined specification.


Reflection and Takeaways
I really enjoyed this project, it felt fast paced but well scoped enough that it was manageable. I learned a lot both from the engineers helping me and from figuring out new skills on my own. The key skills I developed were:
CAD:
- I learned a lot of Onshape tips and tricks for complex part studios and assemblies, as well as the value of accurately modeling everything ahead of time to avoid having to discover design mistakes during assembly.
Coding in C++:
- I didn’t write the control code but I made some changes to it which required me to use C++ and OOP skills which I hadn’t touched in years
Project Management:
- In order to deliver a quality product in a tight timeline I had to effectively communicate with stakeholders, have foresight about how long things will take, and pull in support when necessary.
If I were to do the project over again, there are definitely a few things I would have done differently. While I believe its important to finalize CAD and your BOM before ordering most parts, there were some things (such as new appliances I had specced) which I knew we were going to buy no mater what the design was going to be. Those appliances got delayed in shipping which almost pushed the project over the deadline. In retrospect it’s obvious I should have ordered them as soon as possible, but I waited to finalize the BOM to get it approved (spending a lot of money on the company card is scary). I also definitely could have made the enclosure smaller, I think with appropriate fan placement a smaller enclosure could still minimize spacial temperature gradient.
